native-subtitle-quote-image
chengyi-ai · chengyi-ai/native-subtitle-quote-image
An agent skill that extracts precise video frames and generates social-media-ready quote images with original or custom subtitles.
保留视频内嵌字幕,精确取帧并生成 3:4 社交长图的 Agent Skill
See it in action
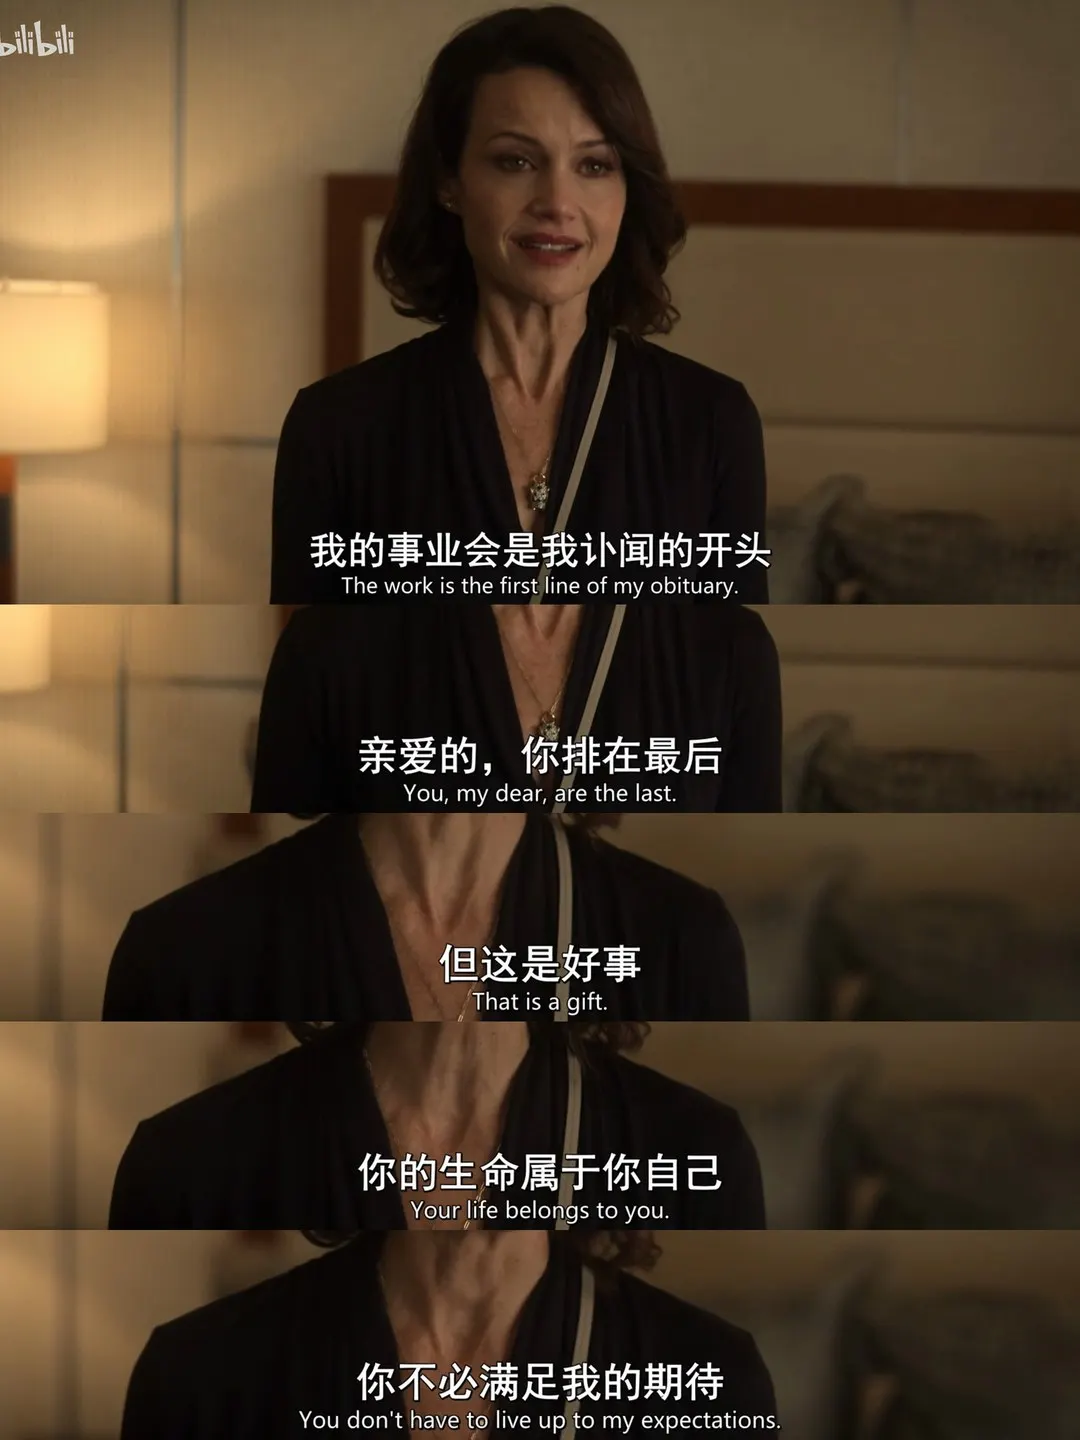
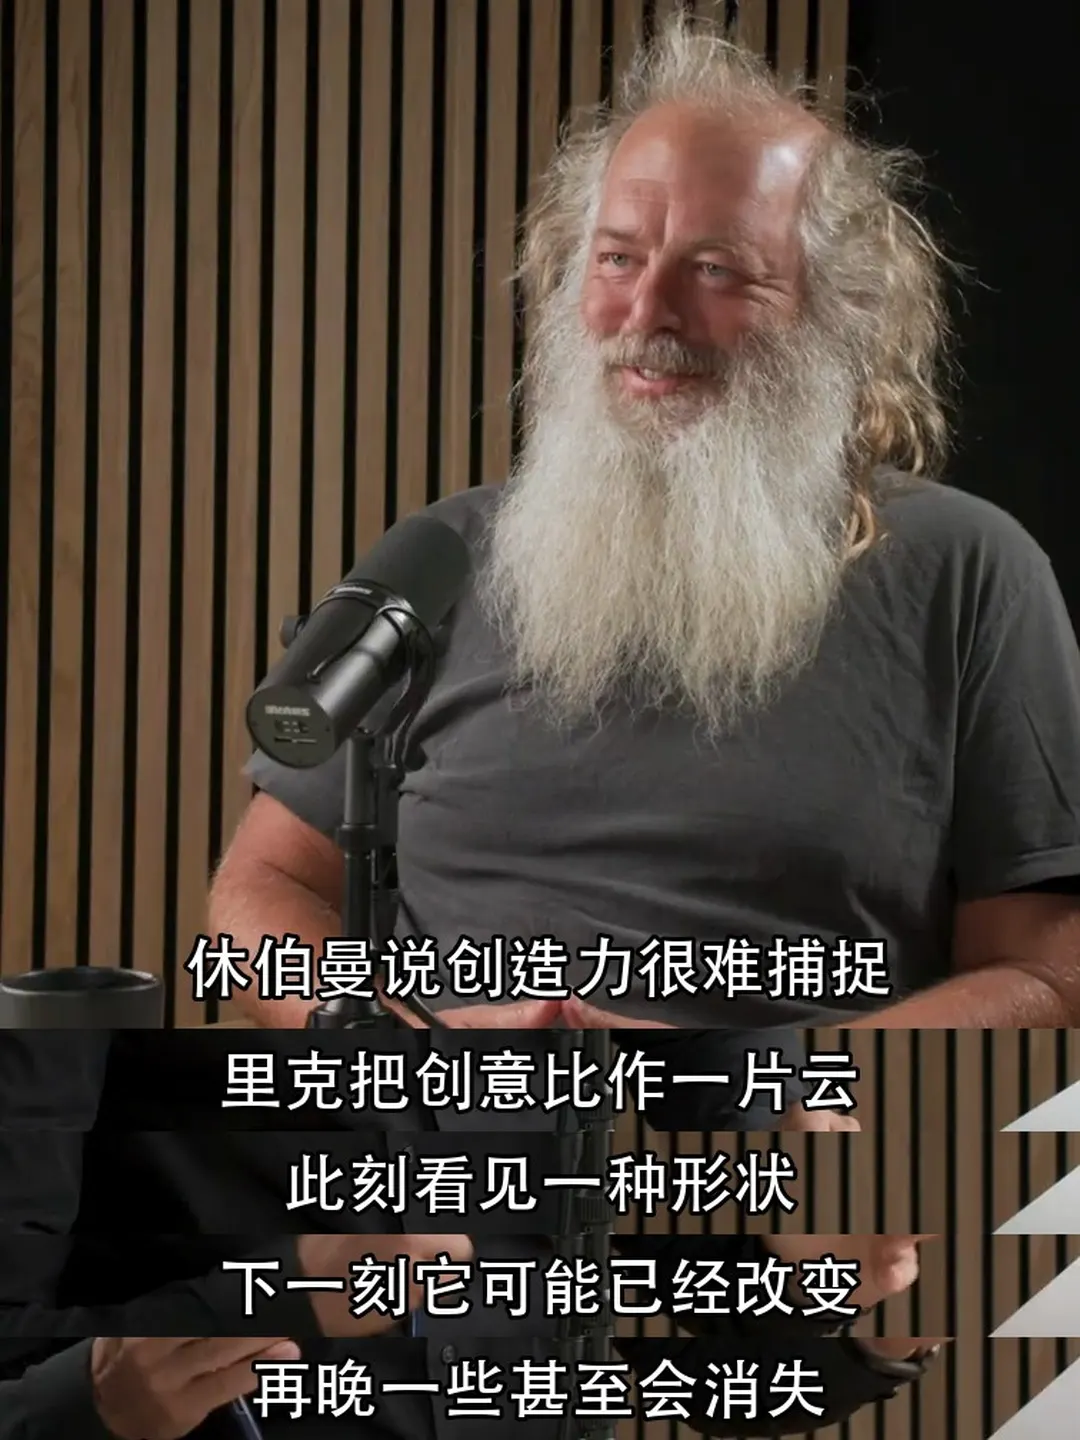
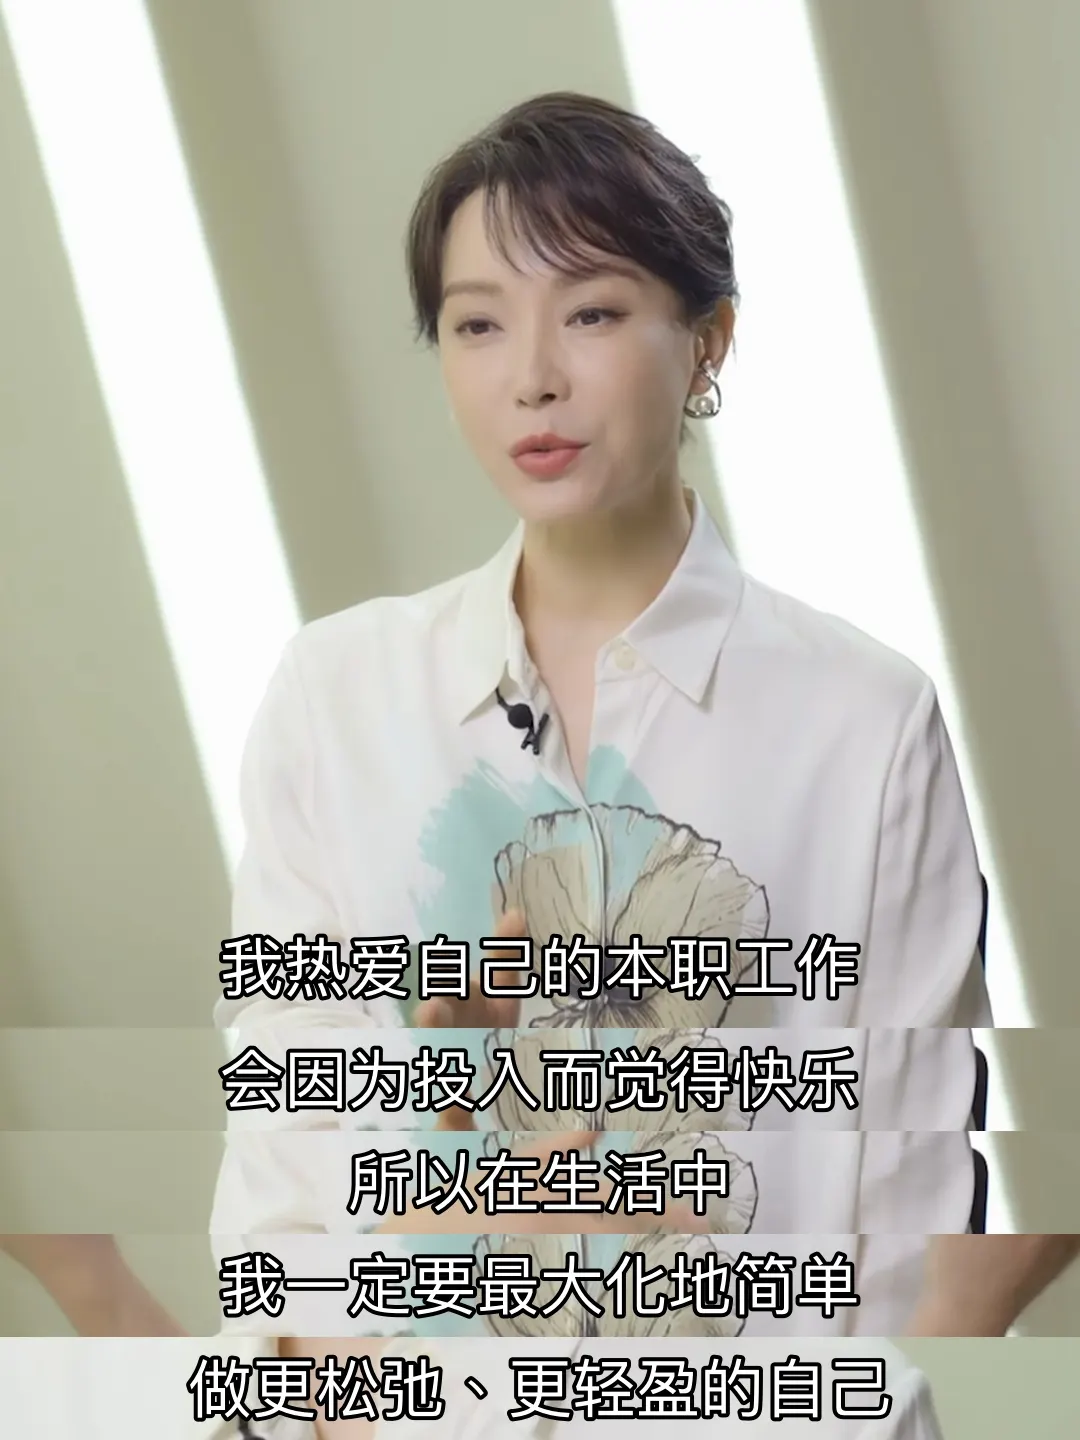
From the author's READMELong quote image created using native video subtitles
From the author's README chengyi-ai ·Source
What you can do with it
- Create viral quote cards from movie clips or YouTube videos
- Batch process video snippets into styled layout images for social media
- Extract specific frames with burnt-in subtitles for documentation
Safety check
No risky patterns found in the files we scanned.
Automated scan of the repo files. Always review code you run.
From the README
把真实视频帧,做成保留原字幕或绘制台词的长图 原生字幕不重绘 · 脚本字幕不冒充原字幕
<strong>快速开始</strong> ·
了解能力 ·
成品案例 ·
两种模式 ·
English ·
한국어
能做什么
- 从视频直接出图:本地文件或 YouTube 链接进来,经过找句子、精确取帧、拼图、逐张质检,输出原生或脚本字幕 JPG,可按内容布局或指定比例。
- 两种字幕,从不混用:原生模式只裁切画面里本来就有的字幕;脚本模式把你审核过的台词画到真实画面上,并标明是后期字幕。
- 版式紧凑:原生字幕先拼源像素,再统一缩放,第一句不会被单独放大;脚本固定布局的主图约占 70%。字幕条之间没有空隙。
- Agent 能用,脚本也能单独跑:在 Codex、Claude Code 等 Agent 里用一句话调用;也可以直接运行 Python 脚本。
成品案例
本页只展示中文字幕作品,均为 3:4、5 句。英文和韩文作品分别在 English 与 한국어 README 中。点击图片查看原图。
<strong>《大巴上的女孩》</strong>原生字幕 · 生命属于你自己
<strong>里克·鲁宾</strong>脚本字幕 · 创意像一片变化的云
<strong>陈数</strong>脚本字幕 · 工作投入,生活简单
- 原生字幕:第一张的字幕是视频里已烧录的非官方中英双语字幕(随 Bilibili 搬运版烧录在画面里),直接从画面像素裁切,未识别、未重绘;左上角是原视频平台的水印。
- 脚本字幕:后两张的中文是后期绘制的整理或翻译台词,不是视频原字幕,也不作为人物的逐字引语。
↑ 回到顶部
快速开始
1. 安装 Skill
git clone https://github.com/chengyi-ai/native-subtitle-quote-image.git
cd native-subtitle-quote-image
mkdir -p ~/.codex/skills && cp -R skills/native-subtitle-quote-image ~/.codex/skills/
用 Claude Code、Codex Skill Installer 或其他 Agent?
Claude Code:复制到 Claude Code 的 Skills 目录。
mkdir -p ~/.claude/skills && cp -R skills/native-subtitle-quote-image ~/.claude/skills/
Codex Skill Installer:在 Codex 中调用 $skill-installer,让它安装这个目录:
https://github.com/chengyi-ai/native-subtitle-quote-image/tree/main/skills/native-subtitle-quote-image
其他 Agent:本项目使用开放的 Agent Skills 目录格式。把 skills/native-subtitle-quote-image/ 复制到目标 Agent 的 Skills 目录即可,具体位置以该 Agent 的文档为准。
2. 安装依赖并自检
python3 -m pip install -r skills/native-subtitle-quote-image/requirements.txt
python3 skills/native-subtitle-quote-image/scripts/check_environment.py
要处理 YouTube 链接,再装 yt-dlp:
python3 -m pip install -U "yt-dlp[default]"
python3 skills/native-subtitle-quote-image/scripts/check_environment.py --url-mode
要画中日韩台词,用 --script-mode 检查字体。环境自检是只读的,不会自动安装或修改任何软件;缺组件时,Agent 会先说明用途,征得你同意再装。
3. 重开一个 Agent 任务,说一句话
使用 $native-subtitle-quote-image,把这个带内嵌中文字幕的视频做成原生字幕拼图。
↑ 回到顶部
两种字幕模式
如果你没有指定模式,Agent 会先问“您当前是选择原生字幕还是脚本字幕?”,并用一句话解释两者区别,再按你的选择处理。
| 原生字幕 | 脚本字幕 | |
|---|---|---|
| 什么时候用 | 关掉播放器的 CC 后,字幕仍然烧在画面里 | 要把已核对的台词、翻译或观点画到真实画面上 |
| 图里的字从哪来 | 视频像素本身,不 OCR 重绘,不翻译改写 | 你审核过的 lines[].text,明确属于后期字幕 |
| 命令 | render | render-script |
[!IMPORTANT] 原生模式的字只能来自视频像素;脚本模式的字只能来自已审核的 JSON,不能冒充原字幕。 如果你要原生字幕,但视频只有可开关的字幕轨,Agent 会先说明限制,经你同意后才改用脚本模式。
工作流
flowchart LR
  A[本地视频或 YouTube 链接] --> B[获取视频与字幕轨]
  B --> C[检查真实帧区分烧录字幕]
  C --> D[按文字稿选题选句]
  D --> E{锁定模式}
  E -->|原生| F[裁切画面里的字幕条]
  E -->|脚本| G[绘制已审核台词]
  F --> H[按模式渲染逐张质检]
  G --> H
Skill 支持三种工作方式:
- 本地成片:直接从本地视频选句、取帧、出图,不需要
yt-dlp。 - URL 完整流程:用
yt-dlp获取你有权处理的视频、元数据和辅助字幕轨,再决定字幕模式。 - 内容生产:读视频、选题、写文章或帖子,最后配字幕截图。其他内容类 Skill 负责上游,本 Skill 负责时间点、真实画面、字幕来源标识和质检。
↑ 回到顶部
用一句话调用
| 场景 | 对 Agent 说 |
|---|---|
| 视频自带烧录字幕 | 使用 $native-subtitle-quote-image,把这个带内嵌中文字幕的视频做成原生字幕拼图。 |
| 给的是链接 | 使用 $native-subtitle-quote-image,读取这个 YouTube 链接,先检查下载权限和烧录字幕,再选 3 个适合传播的主题,做成原生字幕拼图并逐张质检。 |
| 写稿配图一起做 | 先根据视频文字稿提炼选题并写文章,再用 $native-subtitle-quote-image 为每个核心观点选真实视频帧并出图;先判断原生或脚本字幕模式,不要混用。 |
| 用自己核对过的台词 | 使用 $native-subtitle-quote-image 的脚本字幕模式,把这份带时间点的中文台词画到真实视频帧上,做成紧凑 3:4 长图并逐张质检。 |
[!TIP]
$native-subtitle-quote-image是 Codex 的写法。在 Claude Code 里可以用/native-subtitle-quote-image,或者直接描述需求。
Agent 会先检查来源、字幕类型和候选帧,确定模式后再生成:
- 逐张 JPG,比例符合所选布局;
- 原生模式的
原生字幕时间点.json,或脚本模式的linesJSON; - 多图任务的
final_contact_sheet.jpg总览图。
↑ 回到顶部
命令行
不经过 Agent 也可以直接跑脚本。下面的 VIDEO 换成你的视频路径。
挑帧:生成带时间点的候选帧总览,不用反复试时间点。
python3 skills/native-subtitle-quote-image/scripts/native_subtitle_stitch.py sample VIDEO \
  --start 30 --end 120 --interval 5 --out candidate-contact-sheet.jpg
不传 --start、--end 和 --interval 时,会在整段视频里均匀抽取最多 24 帧。已经知道大概时间点时,可以围绕每个点取前、中、后三帧,避开字幕切换的瞬间:
python3 skills/native-subtitle-quote-image/scripts/native_subtitle_stitch.py sample VIDEO \
  -t 61.2 -t 68.9 -t 74.5 -t 82.0 -t 88.4 \
  --around 0.8 --out focused-candidates.jpg
原生字幕:先用 band 确认字幕的裁切区域,再按 manifest 渲染一组成品。
python3 skills/native-subtitle-quote-image/scripts/native_subtitle_stitch.py band VIDEO \
  -t 61.2 --band-top 0.78 --band-bottom 0.96 --out band-preview.jpg

python3 skills/native-subtitle-quote-image/scripts/native_subtitle_stitch.py render VIDEO \
  --manifest manifest.json --out-dir output-v1 \
  --band-top 0.78 --band-bottom 0.96
脚本字幕:准备 script.json,然后渲染。
python3 skills/native-subtitle-quote-image/scripts/native_subtitle_stitch.py render-script VIDEO \
  --script script.json --out output.jpg --aspect 3:4 --width 1440
保留人物原比例与横屏构图(v2.2.0):两种字幕模式都支持 --layout natural。不指定宽度时保留源宽度,图片高度按实际内容计算,不强制 3:4;指定 --width 也只做等比缩放。
# 原生字幕:保留画面像素,不重绘文字
python3 skills/native-subtitle-quote-image/scripts/native_subtitle_stitch.py render VIDEO \
  --manifest manifest.json --out-dir output-natural --layout natural

# 脚本字幕:仅裁去不需要的底部区域,不把剩余画面拉高
python3 skills/native-subtitle-quote-image/scripts/native_subtitle_stitch.py render-script VIDEO \
  --script script.json --out natural.jpg --layout natural --frame-bottom 0.72
0.72 是示例裁切边界,需按视频实测;默认 --frame-top 0 --frame-bottom 1 保留全帧。--band-center 相对裁切后的画面。原比例布局不与 --aspect / --hero-fraction 合用。“原比例”只描述画面几何,脚本字幕仍是后期绘制。
默认原生布局修正(v2.2.2):render 不传布局或比例时,默认按内容计算高度、保留源宽度。明确加 --aspect 3:4 --width 1440 时仍输出 1440×1920,但对整张拼图统一等比缩放,保留完整字幕,不分别填满主图和字幕条(v2.2.2 用留黑边适配画布,v2.3.0 起默认先统一裁两侧,见下)。原生模式的 --hero-fraction 仅调整源主图裁切高度,受源帧限制;脚本字幕仍默认固定 3:4。输出比例不匹配时,不能用非等比 resize 硬改。
横屏视频出 3:4 少留黑边(v2.3.0):原生 render 的固定画布默认 --fit crop:先自动识别每句字幕的左右边界,再对整张拼图统一裁去两侧,最多裁到字幕安全边界,剩余差额才留黑边。所有字幕仍是同一缩放倍数;任何一句识别不到字幕边界时不裁切,退回整图留边。人物偏左或偏右时,用 --crop-center 0.4 这类数值移动裁切窗口,窗口始终包含全部